Showing posts with label digital stamps. Show all posts

Thursday, August 27, 2009

Children May Know...Thank You Card and Check Holder


One of the our neighbors had invited my son to vacation bible study last week. This was the first time he would be attending bible study and was so nervous he wouldn't know anyone. But I kept reassuring him that most likely he will find children who had gone to his preschool and some of the other neighbor kids were attending as well. Vacation bible study was held for 5 days for 2 hours long so hubby and I got a chance to spend some one on one time with my daughter - it was very nice.

On the last day of the class, I made a yummy dessert, Chocolate Chip Cheesecake Bars, for the kids during snack time and created a two-in-one project that was a thank you card and check holder at the same time. I used the template from Designs by Lisa Somerville (Grad Money Holder Tutorial). She has a lot of tutorials so make sure to check out her blog!

In Lisa's sample, the inside piece almost looks like a bookmark, but because of time constraints (I was trying to finish it within the 2 hour timeframe before I had to pick up my son), I opted not to put all of the frillies at the top. My hubby and I decided to give the church a pretty hefty donation because my son absolutely LOVED going to bible study. So I created a slit underneath the sentiment (way at the bottom) with the SU slit punch to hold the check in place.

I thought a religious sentiment/verse was appropriate for the card so I downloaded some Elegant WordArt by Bethany you can find in this post. She is one super talented gal and has a great eye for putting words together so elegantly! There were 5 separate pieces to the verse so I hope I pieced the whole verse the right way. I used 2 different flower images from Inkadinkado Garden Delight stamp set colored with Stampin' Up markers on both sentiment layered pieces - oh yes, I actually inked some neglected stamps!!! I actually tried the rock and roll technique (I know it's hard to see it in the pictures but there really are two different colors on the flower petals).

When I finally picked up my son, I took a picture of the whole class and handed the card to the volunteer coordinator. After she read the card and message I wrote on the back, she was crying (in a good way)! I think she was just touched mostly because she loved having my son there! He is such a good boy! We are so proud of how grown up he is!

Thanks for stopping by! Happy Digi - Stamping!


Digital Stamps: Elegant WordArt by Bethany (Children May Know)
Stamps: Inkadinkado (Garden Delight)
Paper: Memory Block (Inspirations)
Cardstock: Georgia Pacific (White), The Paper Company (Dark Blue)
Ink: Tim Holtz Distress Ink (Antique Linen), Stampin Up (Old Olive, Positively Pink, Ruby Red, Close to Cocoa)
Accessories: Stampin Up (Paper Piercer, Slit Punch), Offray (Baby Blue Ribbon), Crop-a-Dile

Wednesday, August 26, 2009

Angels Landing: Best Friends Fur-ever

This week at Angels Landing, the theme is Friendship. I chose to create a viewmaster card that I have always wanted to try out. You can find the tutorial here located in the Resources forum on SCS. I had this vision of cats getting stuck in a tree and that is what inspired me to create this card. LOL! In lieu of my inspiration, I chose to use images from the newly released sets: Cats and Kittens and Cat Paw Prints.

According to steps 3-5 on the tutorial, a 1/8 inch handheld punch was used to create notches on the final circle. For those of you who don't own that many handheld punches, like me you learn to improvise. I used my trusty ol' crop-a-dile to make the notches (I used both the big and small punch making sure you are only punching out a half of a circle - worked beautifully!).

After the circle was complete with notches, I lined it up behind the front panel to make sure it was placed perfectly behind it before poking a hole for the brad (the brad is covered by the top of tree). I don't own any circle punches, so I used my classic circle nestabilities to punch a hole through the top panel covered with patterned paper just a little above the brad. I used my circle coluzzle to create the partial hole on the side of the front panel as well as the base layer so you can access and spin the circle.

I followed the tutorial to a tee until I got to the part on stamping images through the punched hole. Because I was using digital images, it took a lot of time of toying around with the placement of the images through the punched area of the tree. I had to also play with the sizing of the images to fit the circle. It would have been very difficult to directly print onto the circle so after the images were printed and colored, I used the same size circle die cut I used for the front panel to cut out the images as you can see below.

For the tree trunk, I used one of Mel McCarthy's digital images, tree trunk, you can find here. I printed it on chocolate cardstock and cut it out. I used Elmer's glue to stick the tree trunk to the front panel. The top of the tree was cut with the blossom nestabilities die cut and embossed with the Cuttlebug leaves embossing folder for a 3D effect. I finished off the card with another image of a cat sitting at the bottom of the tree waiting for his friends to come down. For a more vintage look, I added a crochet ribbon adorned with buttons and string. I added a ground embossed with the Swiss Dots embossing folder distressed with Antique Linen ink and glitter glue (I drew in the curves for the ground and hand cut).

For the inside of the card, I used some scrap pieces of patterned paper to line the inside cardstock layers. I adjusted the circle sentiment that reads "Have a great birthday...Hope it's the cat's meow" from Cat Paw Prints in my PSE software program so that two kitty friends could sit nicely inside the circle. Again, the cardstock edges were inked with Antique Linen distress ink.

On a sad note, this is my very last project for Angels Landing...Waaaahhhhhh!!! I can't believe that 3 months had already gone by. It really gives the meaning to the age old saying "Time flies when you are having fun!"

Judi planned it perfectly for the theme this week: FRIENDSHIP. I am dedicating this last project to Judi. She was one of the first people to give me this wonderful opportunity to work in one of the best DT environments you could ever ask for - she is one SUPER organized gal and one SUPER talented artist - I've become a BIG fan of her artwork!! She is a SUPER friend and boss!

So for all of you who applied for the Fall DT and get a chance to work with Judi and her images, you won't regret it...She is fabulous to work for! Thanks so much from the bottom of my heart Judi for believing in me and my work! I won't ever forget your generosity! Love yah!

This might be my last project as an Angels Landing DT member, but you will still see me creating cards and projects with Judi's images...only I'll be the spectator this time! *wink*

Thanks for visiting and till next time...have a paws-itively purr-fect day!!!


Digital Images: Angels Landing (Cats and Kittens, Cat Paw Prints), Melstampz (Tree Trunk)
Paper: K&Company Classics
Cardstock: The Paper Company (Chocolate), Georgia Pacific (White)
Ink: Tim Holtz Distress Ink (Antique Linen)
Die Cut: Spellbinders (Classic Circle, Blossom Nestabilities)
Embossing: Cuttlebug (Swiss Dots, Leaves Embossing Folders)
Accessories: Crop-a-Dile, Scotch Mounting Tape, Glitter Glue, Crochet Ribbon, Vintage Buttons, String

Thursday, August 20, 2009

Tea and Cookies Birthday Card

My father-in-law's birthday is coming up next week so I needed to make a quick masculine birthday card. I have been having fun using vellum lately that I was inspired from my acetate kitty card shown here to create a card using vellum this time as the card base. Just like the acetate, the vellum I used is very flimsy so the more layers, the better.


Back in the Spring, I bought a whole box of aged newspapers (you can kind of see the front of the newspaper in the background), music sheets and bound books from a local flea market. The lady said she found these in her attic while cleaning up and did not want to throw them away so I took some off of her hands since I am such a fan of vintage items as you couldn't tell already. LOL!

The front of the card uses a newspaper clipping I scanned and created a jpeg file out of so that I could resize it for my card. I recently acquired a digi stamp set called Relax from Bean Pod Frog Shop (an etsy store) whose very new to the digital stamp world. Ann and her daughter have teamed up to create some wonderful digital images. Her daughter is the illustrator and Ann creates samples for the Bean Frog Pod blog you can find here. I thought this was the perfect image to use except I had to alter it a bit since it was going to be a masculine card (Ann - I hope that is ok! SMILE). There was an area in the cup where flowers were doodled in it and I just simply replaced it with curvy lines in my PSE software program. The image is printed twice - once directly on the newspaper clipping and a second time on cardstock, colored with prismacolor pencils blended with baby oil, cut out and popped up with Scotch mounting tape. The edges were inked with Tim Holtz distress ink (Antique Linen) and the edges of the cardstock panels were distressed using the edge of my scissors using a back and forth motion until the amount of distressing is achieved (I don't currently own a distressing tool).


Again, I used the newspaper clipping as a base for the inside of the card so that I had a sturdy base and created a panel to write a message on distressed with Antique Linen ink to match the front cover. When the front cover is closed, you can see a silhouette of the newspaper clipping through the vellum which makes for a very cool effect!

So make sure you stop by the Bean Pod Frog blog and leave some lovin'!

I've attached a scanned image of the newspaper clipping if you would like to use it on your cards/projects. It's a clipping from the Dakota-Farmer published in 1930. You should read some of the articles and ads - they are hilarious!


Wednesday, August 19, 2009

Angels Landing: Back to School Gift Set

Hello All...it's Wednesday and you all know what that means! Yup, it's time for Angels Landing Wednesday Themed DT Projects. This week is all about Back to School.

Sigh! Summer is shortly coming to an end and the start of school is just around the corner...And as you all know, a couple months back, my son graduated from preschool and will be starting kindergarten in two weeks! He's grown up so fast and I am going to miss my little man! Boo Hoo!


To welcome my son's teacher to the new schoolyear, I created a back to school gift set. The gift set includes a journal (a composition notebook cut in half) with matching beaded pen, a bookmark and card. Doesn't this bring you back to the good ol' days of being in school?

There are so many cute Angels Landing images that I couldn't just one so I've incorporated 3 different adorable bear images on all 3 pieces from the Mini Bears and Birds digi-stamp set.


This bookmark uses Bearly Adequate bear - isn't he just adorable??? I used my classic rectangle nestabilities to frame the little guy and rounded the corners. The edges are inked with Antique Linen distress ink and Stampin' Up Rose Romance inks. The pink scallop border is actually a piece of felt. This is the first time I've cut felt using my nesties and cuttlebug. It was somewhat difficult to cut through one layer of felt but if you run through a couple of times, the felt will be cut enough that you can just cut away the rest with scissors. (Cuttlebug Recipe: Plate A + Plate B + Felt + Nestie + a piece of scrap paper folded in fourths + Plate C). The Big Shot might cut through the felt a little better.

I wanted to somehow incorporate a calendar that the teacher could quickly glance at during the schoolyear so I created an all in one bookmark inspired by a template that a fellow SCS'er is gracious enough to share every year. You can download the 2009 calendar here especially made for a bookmark (here's a link to the 2010 calendar template).

In lieu of the school theme, I used a fun cool font called LA El 2 that you can download from fontspace.com (click on name of the font for a direct link). It is in the category under "elementary" if you want to see more versions to use for school themed projects. Most of the fonts on this site are compressed files (zip files) so you will need to do the following in order to save it to your fonts folder:

- Click on Download button for desired font
- A new menu (File Download) will open up, click on Open
- A new window will open up with the font files, click on Extract Files
- Once the files have completely been extracted, another window of the extracted files will pop up
- Right click your mouse and copy the file with the symbol "TT" that stands for TrueType font (in this case the file was called LA_E_2)
- Go to the Start menu, open up My Computer
- Click on the C: drive, open up the Windows folder
- Scroll down to fonts folder, right click on mouse and paste

** Unfortunately, you have to take these extra steps just to save a font to be able to use it (unless you can find a shorter way, please let me know - LOL!)

I created a little tag that says "Read" at the top of the bookmark. Since we didn't know who my son's teacher is going to be yet, I wasn't able to customize the gift set so I created a little tag that says "This book belongs to _________" for her to put her name on it.


Next up is a mini journal that the teacher can use for notes. I bought a whole bunch of composition notebooks awhile back and went to OfficeMax to have them cut in half. It costs $1 per cut. The half composition notebooks are a lot of fun to decorate as much as the full version. Again, staying with the school theme, I added a border of the font underneath the main image. For the image, I used Chubby Cubby bear. I thought he was the perfect image to use on a notebook. I created the same technique on the main panel as I did with the bookmark. I topped it off with a wide grossgrain ribbon tied with srting on the side, crochet fleurette with button and crochet thread. I also made a matching beaded pen (you can find the tutorial here on SCS).

And, of course, you can't give a gift without a matching card. I used scraps of patterned paper from the notebook and created two panels behind the main image. This time, I used Cubby Cousins bear. Doesn't he look like he is lovingly looking at the teacher? I just love the expression on all of the bears it was hard to use just one main image. Since teachers are a special part of a child growing up, I added a sentiment that says "Inspire" on the card. I used the spiral punch on the background panel to make it look like it was torn out of a notebook. For added effect, I added some piercing on the top and bottom of the panels along with a wide grossgrain ribbon tied with string.

Thanks for stopping by! Make sure to check out the other DTs creations for today at the Angels Landing blog!!!


Digital Stamps: Angels Landing (Mini Bears and Birds)
Paper: Me and My Big Ideas
Cardstock: Georgia Pacific (White), Jo-Anns Value Pack (Brown), Unkown (Kraft)
Inks: Tim Holtz Distress Ink (Antique Linen), Stampin Up (Rose Romance)
Die Cut: Spellbinders (Rectangle Nestabilities)
Punches: Stampin Up (Spiral)
Accessories: Pink Felt, String, RSVP Pen, Microbeads, Terrifically Tacky Tape, Scotch Foam Mounting Tape
Coloring: Prismacolor Pencils blended with baby oil

Wednesday, August 12, 2009

Angels Landing August Blog Hop: Have a Paws-itively Purr-fect Day

Welcome to Angels Landing August Blog Hop. If you missed the beginning of the hop, head over to Judi's blog and follow the links.

Today, the Design Team is introducing two new digital image sets for August, Cats and Kittens and Cat Paw Prints. And like all of the other AL sets, they are absolutely adorable!


For my sample, I created an acetate card. If you've never tried to make an acetate card, check out this tutorial on SCS. I went a little vintage on this (not a surprise since I always tend to go that way on most of my cards) and used the cracked glass technique (you can find the tutorial here) since the cats were calling for an antiqued look. I thought it would be fun to use the sketch layout from Sheetload of Cards August ezine.

As you can see, you have to be pretty creative with the placement of your cardstock and/or patterned paper when using acetate. In this case, I just used a good ol' transparency sheet (I bought a whole box from an office supply store). Transparency sheets are a bit flimsy but it becomes sturdier as you add your layers of cardstock and/or patterned paper. This card is a 5.5 inch square card. I thought it would be fun to print out the kitties from the Cats and Kittens digi set on an offset position in each square. Then I used the cracked glass technique on each square. Then I added the sentiment from Cat Paw Prints to finish off the card. I used my slit punch for the scalloped border and adorned each scallop with a dot of 3D Scribbles Iridescent White Mist paint to make it look like faux pearls. Then I used one of my favorite combo embellishments using wide grossgrain ribbon, a crochet fleurette (which I made myself), button and string.

The inside of the card is lined with layered cardstock and patterned paper with polka dots and pawprints which has unfortunately been covered with a square piece of vanilla cardstock for a place to write a message on. I guess I could have put the inside layers underneath the top layer on the front side of the card, but then it would have covered the whole front of the card and you wouldn't be able to tell it was an acetate card.

So there you have it...hope you enjoyed my sample!

I am currently enjoying my camping trip this week and was able to schedule this post ahead of time. With that said, I am your LAST stop on the blog hop.

Head on back to the ** Angels Landing blog ** to make sure you didn't miss anyone's blog. Make sure to leave some lovin' cuz you might just win some sets for yourself to play with.

Thanks for coming by the Angels Landing Kitty bloggity hop!


Have a Paws-itively Purr-fect Day!


Saturday, August 8, 2009

Diving Deeper into the DigiWorld: Elegant WordArt Creative Team


Wowza! It's been such an unbelievable ride down the DT road! I've personally been invited to join the Creative Team at Elegant WordArt by Bethany. It will be an honor working beside the other CT gals. Mentioned in a previous post, I just recently discovered the work of Bethany Harty! She specializes in digital wordart and one truly talented gal - you can see her work at Elegant WordArt by Bethany. I never knew how powerful a sentiment can add to a card/project.

I'll be joining Bethany's team of digi scrappers which I want to dive into one of these days, but they also create hybrid samples as well using Bethany's wordart in combination with digi scrap kits found at ScrapOrchard. It's kind of scary knowing I will be stepping in the digiscrapping world (it looks so intimidating), but I'll be able to introduce them to a whole new side of papercrafting.

To see more of and to purchase Elegant WordArt sets, head on to ScrapOrchard.

More samples to come! Thanks for stopping by!

P/S - Notice my new siggy? You like? I made it myself...finally learning the tricks of the trade on PSE and blogger techniques. Woo hoo!


Wednesday, August 5, 2009

Angels Landing: Baby Girl Frame and Card


The theme for this week at Angels Landing, is Scrapbook. One of my stamping friends just recently announced that she is a proud grandma of a little baby girl. So, of course, I didn't want to pass up the opportunity to make a baby gift - just because they are so much fun to make! I chose to create a frame so that my friend can show off pictures of her new granddaughter.

I used a 7x14 frame that I bought from Wal-mart. These frames come with a 2 picture matting panel that I just took out. I custom made my own matting by doing the following:


1) Cut a piece of cereal box to size 4 7/8 x 12 inches. I use cereal boxes all of the time for faux chipboard because they are sturdy but thin enough to cut through.

2) Cut a piece of patterned paper the same size as the cereal box/back piece. Adhere to cereal box with double stick tape or red sticky tape. Double stick tape does the trick if you don't want to mess with sticky tape.
3) As a guide, I placed my patterned paper panel flat on the table and laid the frame over it (minus the glass) and traced the opening on the patterned paper. This will help as a guide for image and frame placement.

3) Begin to measure how far apart you want the image and 2 cutout frames to be. At this point, you should choose the the size Nestie you want to use - I chose to use the classic square and scallop square nesties. Place the scallop piece where you want it to go and lightly mark with a pencil. I just marked the top scalloped edges as guidelines.

4) Cut out your scallop square and adhere with tape on matted piece. The pencil guidelines will look slightly larger than your piece, but you can get a general idea where to adhere the scallop squares onto the patterned paper panel.

5) Take your patterned paper panel and place in your die cutting machine (I use a Cuttlebug). Carefully place the regular square die on top of the scalloped square (making sure that the square does not move), place the C plate over the panel and cut out square (I used the following sandwich recipe: Plate A + Plate B + Patterned Paper Panel + Paper folded in Fourths + Plate C). It was a little bit of a tight fit, but it wasn't too tight to break the C Plate. When I was done, the square already left an embossed look on the scalloped square. NOTE: The die won't cut through all of the layers so you will have to use a craft knife to cut out the square completely.

6) Repeat step 5 for scallop square #2.

There you have it...custom matted panel with 2 frames. I think this is so much prettier than what came with the frame originally.

The elephant image is from Toys on Wheels and printed to size 3.53 x 3.94 inches. I printed the elephant image twice: once on cardstock and a second time on patterned paper for paper piecing (sponged a little Antique Linen distress ink on the patterned paper). I customized the frames with the "Baby Girl" sentiment from Toys on Wheels so not to leave the frames looking empty. The cardstock was cut down to 3x3 square, distressed with Antique Linen ink, and taped behind the back panel. This way, my friend, can choose to keep the frame as is or put pictures of her new granddaughter in it.

The wheels were a little tricky. It took me a couple of tries to get the right size so that it matched the size of the wheels that the elephant was standing on. The printed size of the wheels is 1.08 x 3.33 inches and it fit the frames and layout perfectly. The wheels were printed out on textured vanilla cardstock which made it look like authentic wooden wheels when colored with a prismacolor pencil blended in baby oil.

I wasn't satisfied yet so to make it look a little more girlie, I added a little pink bow on the elephant as well as finished it off with a green satin ribbon, prima flowers, button and string (which seem to be one of my favorite embellishment combos lately).

And the gift wouldn't be a gift without a matching card. A simple card made with nesties labels one. The elephant is popped up on dimensionals and topped off with a pink satin ribbon.

Thanks for coming by! Go on and check out the other DT gals creations!!! Have a great day!


Digital Stamps: Angels Landing (Toys on Wheels)
Patterned Paper: K& Company (Brenda Walton)
Cardstock: Unkown (Textured Vanilla)
Ink: Tim Holtz Distress Ink (Antique Linen)
Die Cut: Spellbinders (Square Classic Nestabilities, Labels One)
Accessories: Offray (Satin Green, Pink), Prima Flowers, Button, Crochet Thread, String, Scotch Mounting Tape, Frame from Wal-mart size 7 x 14

Sunday, August 2, 2009

TimNShells New Release: Ballooning Away Friend Card


Michelle Seward just released some fab new digi images in her store you can find here. She is so talented and she is so good with creating the perfect layout for a card and her coloring is phenomenal...check out her card gallery here.

For only $3, you can purchase this image called Ballooning Away. This is such a sweet image you can use any kind of sentiment to suit this. I chose to pair it with a vellum quote from DCWV Quote Stacks: Love and Friendship. I've only used one vellum quote out of the pack so I intend to use more cause' they are so much fun to use. I didn't want to cover up the image up entirely but I like how it shows up nicely against the vellum quote. The image is colored with prismacolor pencils blended with baby oil (the only coloring medium I've been using since I got my pencils - love them!). I've got to take coloring lessons from Michelle...I am not so good at creating shadows yet. I used my scallop scissors to create the scallops for the background layers and used my rectangle nesties to frame out the image. I topped it off with a ribbon I had been hoarding for 2 years now and clear mini decorative accents from M's. Again, more patterned paper scraps from My Mind's Eye.


I'll be posting another card from TimNShells in the next few days since I have not had a chance to color it in yet.

Elegant WordArt Cards


Since becoming so addicted to digital images and sentiments, I have been on the hunt for some cool images online. Before being introduced to Digiments, digital sentiments were just making their way on the popularity scale along with digital stamps. Michelle, the owner of Digiments, has created some fabulous sentiments.

A couple of weeks ago, a fellow DT member, Laurie Ingram (aka Paperville), introduced me to Elegant WordArt by Bethany Harty. I just love how she has such great vision putting together wordart. You can find freebies listed on the left side of her blog - there is many of them and she adds a new one every week - how cool is that? Bethany ROCKS! Aren't they so breath taking and just so inspirational. If you are looking for more of Bethany's work, you can purchase digital wordart sets including digi scrapping kits in her store called ScrapOrchard - very affordable! Hope to do some digi scrapping one of these days.

The first two identical cards, I used 2 Sketches 4 You: Laura's sketch 30 from July 13. Of course, I missed entering these again. Oh well, most of the time, I'm not in it for the prizes, just the inspiration.

The third card is based from a new sketch challenge blog started by fellow DT member, Leigh Ann Baird (Stamping with Annie B) called Sketch Girl. This is the first sketch challenge that Leigh Ann posted: SG1. Thanks Leigh Ann for the inspiration!

The two cards that have butterfly sentiments (I made 2 of the cards that have the busy flowers on them) were thank you cards sent to my MIL, Mom and Aunt for sending me some goodies for my birthday (I was able to buy some things I've been wanting for awhile - some of the newest Nesties! Yay!!!). And the third card with the Answer to my Prayers sentiment is going to someone really special. She is a follower so hope she misses this post - teehee! I made a special project to match the card that I will post later.

You may have noticed that I have been posting cards with paper you have seen before. I've been trying to be good and use up some scraps before tearing into a new piece of paper. You gotta love those paper pads from M's and Jo's - everything coordinates so perfectly so there is no guessing!

Thank You CD Case and Card


This is a card I made as a thank you for the family who offered to host the high school's varsity baseball banquet last June. It was potluck so they provided part of the main course (we brought the other main dishes) and everyone else brought the rest. Since I took many pictures of the event, I created a CD to give to them. Their son just graduated and I was able to take a lot pics of him with my husband handing him an award and team pictures. I wanted to kill two birds with one stone, so I created a CD case/5.5-inch size card.


To make the CD case/card:
1) Using a 8.5 x 11 sheet of cardstock - turn cardstock so it's landscape (11 inch edge is facing up), score at 5.5 inches (this will be your fold)

2) For the pockets, turn the cardstock around and score 3 inches.

OPTIONAL: I cut down the pockets diagonally for added interest, but you can leave it as is.


I finally got to use an image from Nina (Crafting from Croatia). She was gracious enough to offer some free downloadable images on her blog. You can find the links on her sidebar. I did not even realize that she is an illustrator for Gina K Designs - how cool is that??? No wonder I was so drawn to her images when she first posted them in the Digital Downloads forum on SCS.

I paired the image with the "Thank You" sentiment from Digiments - Simple Sentiments series. I just love using Michelle's digiments! Unfortunately, sales have been slow so you 'll have to wait until September for a new release. I think it's been slow everywhere with summer vacation. Part of the digital sentiment (although hard to see) was highlighted with Aleene's Paper Glaze. I did not really take a great picture of the front because we were on our way out and I was in a hurry - oh well.

The sketch was based from the Dare U2 Digi Stamp Challenge #17. I missed entering it because it took me long enough to take a picture of it. Oh well!


Digital Stamps: Crafting in Croatia (Blossom for Mom), Digiments (Simple Sentiments)
Patterned Paper: Me and My Big Ideas
Cardstock: Jo-Ann's Value Paper Pack (Brown), Georgia Pacific (White), Unknown (Kraft, Vanilla)
Accessories: Wide Grossgrain Ribbon, String, Martha Stewart Lace Punch, Aleene's Paper Glaze
Coloring: Prismacolor Pencils blended with Baby Oil (Process Red, Pink, Blush Pink, Lime Peel, Apple Green)

Wednesday, July 29, 2009

PARTY! PARTY! PARTY!

It's Wednesday today and guess what the theme is this week at Angels Landing. P-A-R-T-Y!!!


For my sample I chose to create a spinner card invitation and acetate favor box. I've always wanted to make a spinner card and, boy, it was sure fun to make! You can see below how interactive it is...


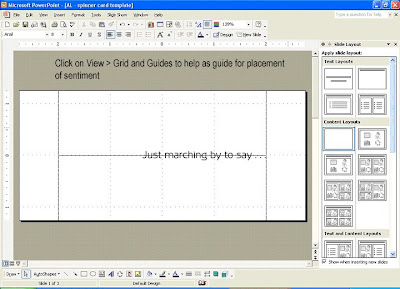
You can find the tutorial for the spinner card here (Angie Juda Kennedy aka ChicnScratch Live has a huge library of video tutorials - she ROCKS!). Because of the size of the card, I had to keep it simple on the outside. This was quite hard for me because I always have to add some kind of embellie to a card and I got away with adding a white grossgrain ribbon on the right corner. After watching Angie's video tut, I thought it was going to be hard to line up the punched middle where the sentiment goes, but it was quite easy. Now I have a template to use for any future cards I'll be making. Because I wasn't using an actual stamp for the sentiment, I had to figure out a way to line up the sentiment with the punched opening. I used Powerpoint to set my page and printer setting to to 2.5 x 5.5 inches. Then from Angie's directions, I created two guides exactly where I want the sentiment to be. I've posted a tutorial below for your reference.


For the inside of the card, I was able to simulate the same kind of font used for the sentiment and created an invitation. Isn't that bunny so cute? I am so glad that Judi included musical notes (she includes 3 sets of musical notes so that it is easier to piece them together like I did here without ruining the integrity of the image when resizing.

Wouldn't be cool to receive one of these in the mail??? So fun!


I created a matching acetate favor box filled with Hershey Kisses. I also used the thank you sentiment from Pierced Tags on the side. I was surprised to see how tiny this box came out to be when I finished putting it together - so cute! You can find the tutorial for the acetate box here. I might end up making these for my kids birthday parties.


Digital Images: Angels Landing (Marching Band 1, Pierced Tags)
Patterned Paper: DCWV (Nana’s Kids)
Cardstock: Unkown (Kraft, White)
Accessories: Offray (White Grossgrain Ribbon), Stampin’ Up (Word Window), Scotch Mounting Foam, 2 Pennies, Glitter, Transparency Sheet, Glue Dots, Tacky Tape

Spinner Card Tutorial Using a Digital Sentiment

Here's a quick tutorial on how I did lined up the sentiment for the spinner card - for those visual learners out there:


1) Open up Powerpoint. Click on blank presentation. Click on View > Grid and Guides (this will also aid in the placement of the sentiment)


2) Click on File > Page Setup > Drop down menu "Slides Sized for", select Custom > Enter 5.5 Width and 2.5 Height > Hit Ok


3) Click on Print > Printer Properties > Page Setup > Drop down menu "Page Size, select Custom > Enter 5.5 Width and 2.5 Height > Hit Cancel since you are not printing at this point, your settings should be saved even if you have clicked on Cancel. Since this matches your page setup in the document, it will be much easier to see the placement of the sentiment when you View the slide before printing.


4) Set the size of the sentiment to measure .25 Height x 2.42 Width. I just placed a ruler against the bottom of the punch to see what size the sentiment should be. The great thing about digi images is that you can resize to make sure if fits perfectly in the punched area of the card.

5) Begin by placing a rectangle shape measuring 1.25 x 4 inches over the slide and place so that there is at least 1 inch on each side (this is where you can use the grid lines to help you locate where the 1 inch marks are. You can see the rectangle below (of course you would remove the fill color so you can see where you are working).


6) Now all you have to do is cut your paper down to 2.5 x 5.5 inches. Make sure to print on a piece of scrap paper first so that you don't waste any cardstock in case you have to make adjustments on the placement of the sentiment.

There you have it...hope this made sense to ya'll. Thanks for stopping by!