Showing posts with label tutorials. Show all posts

Wednesday, July 29, 2009

Spinner Card Tutorial Using a Digital Sentiment

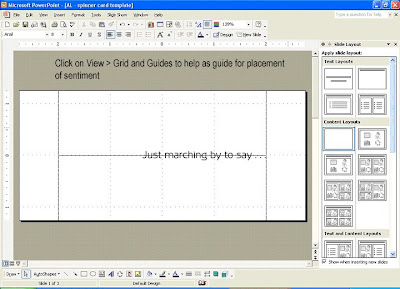
Here's a quick tutorial on how I did lined up the sentiment for the spinner card - for those visual learners out there:


1) Open up Powerpoint. Click on blank presentation. Click on View > Grid and Guides (this will also aid in the placement of the sentiment)


2) Click on File > Page Setup > Drop down menu "Slides Sized for", select Custom > Enter 5.5 Width and 2.5 Height > Hit Ok


3) Click on Print > Printer Properties > Page Setup > Drop down menu "Page Size, select Custom > Enter 5.5 Width and 2.5 Height > Hit Cancel since you are not printing at this point, your settings should be saved even if you have clicked on Cancel. Since this matches your page setup in the document, it will be much easier to see the placement of the sentiment when you View the slide before printing.


4) Set the size of the sentiment to measure .25 Height x 2.42 Width. I just placed a ruler against the bottom of the punch to see what size the sentiment should be. The great thing about digi images is that you can resize to make sure if fits perfectly in the punched area of the card.

5) Begin by placing a rectangle shape measuring 1.25 x 4 inches over the slide and place so that there is at least 1 inch on each side (this is where you can use the grid lines to help you locate where the 1 inch marks are. You can see the rectangle below (of course you would remove the fill color so you can see where you are working).


6) Now all you have to do is cut your paper down to 2.5 x 5.5 inches. Make sure to print on a piece of scrap paper first so that you don't waste any cardstock in case you have to make adjustments on the placement of the sentiment.

There you have it...hope this made sense to ya'll. Thanks for stopping by!

Wednesday, July 22, 2009

Here Comes the Marching Band Post-It Note Holder and Organizer, Tutorial and a Little Some Some...


It's Wednesday DT featured projects at Angels Landing today. The theme this week is cover-ups and I chose to create a matching post-it note holder and organizer along with the Special Dates Folio I created here.

The post-it note holder and organizer was inspired by a tutorial created by Angie Kennedy Juda aka ChicnScratch (you can find her post-it note holder video tutorial here). I basically just took the skeleton part of her post-it note holder and revamped it to my specifications (and I really liked that she added a pen holder as well). Because I wanted to create a matching piece to go along with the Special Dates Folio, I used a manila folder as my base so that I had the little tab sticking out on the side just like the folio I created.
Here is how you can make one of your own...

** Bare with me on my instructions...I had to retake some of the photos since they did not come out real good. I just have to find out a better way to taking pictures of my tutorials so they are easier to see and look more consistent. **


Click on pictures to see a larger version


MATERIALS USED:
- Manila Folder
- Cutter
- 3 Different Kinds of Coordinating Patterned Paper (My Mind's Eye Magnolia dp used)
- Sanding Block
- Terrifically Tacky Tape
- Glue Stick
- Wide Grossgrain Ribbon
- Small Corner Rounder
- RSVP pen
- 3x3 post -it note


DIRECTIONS:


STEP 1: Take manila folder and cut off right side so that you end up with the side that has the smaller tab.


Step 2: Cut 2 of the sides down to 8" making sure to keep the smaller tab in tact. Refer to pic on how I cut the 2 sides.

Step 3: Score at 3 3/4 inches in on both sides. Refer to the picture on scoring. This will become your right and left panels. NOTE: When measuring 3 3/4 inches from the tabbed side, make sure to measure in from the edge and not from tabbed area.


Step 4: For the pockets, score at 2 1/2 inches.


Step 5: This is what your piece should look like. Your finished piece should have the measurements listed above when scoring has been completed on all 3 sides.

Step 6: Cut out the middle piece out as shown in pic above.

Step 7: Trace entire front panel on patterned paper and adhere it using a white glue stick.

Step 7B: Repeat same step for tracing patterned paper for the inside of the holder. For the orange flowers patterned paper, I placed my piece over the paper, folded the pockets up so that I could get a complete traced image on the paper since I wanted to go all the way down to the score line. For the pockets, flip the piece so that the pockets are laying top side and trace around pocket template.

QUICK TIP: I've learned to trace templates on the "right" side (decorated side) of the patterned paper so that you are sure to get the correct pattern when you are ready to adhere paper to your template. You can always erase the pencil marks after the paper has been glued down.

Step 8: Once you have completed gluing down the patterned paper, cut off extra pieces sticking out of the holder. I also chose to sand down the edges with a sanding block once the extra paper pieces were cut off for a more finished look. Use a small corner rounder to round off the tips of the pockets (optional).


Step 9: Instead of using a ribbon belly band like I did with the Special Dates folio, I adhered some ribbon on the inside which serves two purposes: (1) Hold the pen in place, and (2) Keeps the holder closed when not in use. Put the wide grossgrain ribbon where you want before adhering in place (mine is placed slightly below the pockets). At this point, you should place the pen in the middle (hook the pencap to the top part of the holder) so you can gauge how tight or loose you want the ribbon holding the pen.

QUICK NOTE: The perfectionist in me was kicking in so I went the extra step to fold the holder so that the ribbon ends were the same length before adhering it permanently to the holder (refer to pic above). I did this because I wanted to make sure I had enough to tie it in a small bow. Approximate length of ribbon is 30 inches long if you want to tie a full bow, but mine came out to only about 25-26 inches long since I only tied a single bow to keep the holder closed.

Step 10: To completely secure the ribbon in place, I added terrifically tacky tape (1/4 inches wide) to the inside edge of the right and left pocket panels. This will keep the ribbon from moving around and getting undone.


Step 11: For pen, cut a piece of patterned paper 3 1/4 x 1 1/4 inches, wind tightly and place in barrel of pen. Insert the very backing of a 3x3 post-it notepad on the right panel (or left whichever is your preference).

Step 12: I created a printable doc for the Shopping List and Notes ready for cutting - just cut on the gray lines - both lists measure 5 x 3 inches (click here to download). Close holder by tying the ribbon into a full bow or single bow like the one pictured.

Step 13: Decorate the front of the holder. I used the musical notes image from Marching Band 1 and the raccoon playing the cymbals image from Marching Band 2. The image is printed at size 2.5 x 2.15 inches and colored with prismacolor pencils blended with baby oil. I used nestabilities to cut a circle and scalloped circle to showcase the image distressed with Tim Holtz Distress Ink in Antique Linen. I topped it off with a pink prima flower, crochet fleurette and button strung with embroidery thread.


Hope you enjoyed the tutorial and let me know if you have any questions...

Thanks so much for feasting your eyes on my Angels Landing Wednesday project and tutorial. I couldn't let you go down this far into my post and not reward you for reading my long novel...

In celebration of my birthday today (Yay ME!), I am offering some Angels Landing yummy blog candy. All you have to do is leave me some lovin'. You have until 10pm CST on July 26 (Sunday) to enter. I will post the name of the winner on Monday morning. The winner will get to choose 2 digital stamp sets of their choice including the 2 new releases, Marching Band 1 and Marching Band 2.

Click here to see what you could win: Angels Landing digi-stamping store


Digital Stamps: Angels Landing (Marching Band 1, Marching Band 2)
Patterned Paper: My Mind's Eye (Maganolia)
Cardstock: Georgia Pacific (White, Jo-Ann's Value Paper Pack (Teal)

Ink: Tim Holtz Distress Ink (Antique Linen), Stampin' Up (Creamy Caramel)
Other: Prima Flower, Crochet Fleurette, Button, Embroidery Thread, Scotch Mounting tape, 3x3 Post-It Note, Terrifically Tacky Tape, Wide Grossgrain Ribbon

Coloring: Prismacolor Pencils blended with baby oil

Friday, July 10, 2009

Angels Landing Friday DT Featured Project: Home Tweet Home Tile Coasters

Could you tell what my sneak peek was for Friday's Angels Landing DT Bonus??? Well, here is what you've been waiting for...


Today I have a special treat for all of you Angels Landing fans. I created a one-of-a-kind gift set - tile coasters. I had been dying to make a set of these with digital images and I was successful with printing the images on tissue and good ol' Mod Podge. The tile coasters will be given to a family who will be moving into their new home. I don't think they are planning on moving until late August since the house isn't quite finished yet, but I wanted to get this done early so I wasn't scrambling last minute - you know how that goes? The family is actually moving into a house that the high school built.

Every year, a group of students build a double wide home on a designated empty lot across from the school (with a teacher guiding them through the whole building process) and put it up for auction to raise money for the school. The family who bought the one built this past schoolyear is someone who my husband works with. To welcome them into their new home, I thought a set of tile coasters would be a thoughtful gift. I've been admiring the outside of the house since they started building it. And this summer, the owners were nice enough to let us take a peek on the inside, and boy, was I impressed at the workmanship that the students did. They did a superb job outside and inside! The school still has to put some finishing touches so it is still sitting in the lot waiting to be completed. This is such a great experience for the students.

Rather than working with Microsoft Word, I prefer using Microsoft Powerpoint when working with digital images because it is so much easier to manipulate the images. It is easier to drag the image anywhere on your page with the image handles and format the image. Once you start working with Powerpoint, you'll see what I mean.

Because there were so many components to making these tile coasters, I decided to put together a 3 part tutorial below that will have links on my sidebar in case someone wants to try it one of these days. If you have ever made one of these before, you know how tricky it can be when you are working with delicate tissue paper and Mod Podge. I was quite surprised to see how well the tissue took on the color - can you see how vibrant the colors came out using prismacolor pencils blended with baby oil??? The tile coasters require alot of patience, but a lot of fun to make. I combined several images from the following sets to create the tile coasters: Aussie Animals, Pierced Backgrounds, and Simply Flowers.

Forgive me for the not so clear pics (and my un-manicured fingernails) since I was trying to take photos while I was working. Download the tutorials here:


NOTE: I don't have the software to convert the MS Word files into a .pdf file, but let me know if you cannot open the files attached and I can try to send it to you another way or if you have any questions.


Digital Images: Angels Landing (Aussie Animals, Pierced Backgrounds, Simply Flowers)
Ink: Palette Burnt Umber
Accessories: Mod Podge, Sponge Brush, Sponge Dauber, 4x4 Bottichino Tiles from Home Depot
Coloring: Prismacolor Pencils blended with baby oil (White, Goldenrod, Sepia, Crimson Red, Apple Green, Vermillion)

Sunday, March 8, 2009

I taught my first class! Yay me!

I was asked to teach a card tote class by my TAC demo. She gave me some paper and 2 TAC stamps sets she wanted me to work with and I did the rest. It was a small group of 5 gals...so it was a great opportunity to teach my first class. I created three samples, typed up the instructions and created templates with sizes and where to put the tape for those visual learners like me.


For the first one, I created a mini magazine card holder (adapted to hold regular sized cards). I created one using 2 pieces of 8 1/2 x 11 paper and one using 12x12 paper. I provided the group 3 sets of instructions (2 of them using 12x12 paper) to play around with. I used TAC Flower Trio Collage stamp set. I watercolored the flower distressed the edges and used Nesties for the regular circle and scalloped circle. This also gave me an opportunity to make a 3d banner with sentiment. have to give credit to the following folks who made this template/project a possibility:

Template #1 using 12x12 paper: Jeni Allen - My Stampin' Spot
Template #2 using 12x12 paper: Vicki Wizniuk - Wizard's Hangout
Template using 8.5 x11 paper: Melinda Wharton - Sunflower Stamping
Original Templates from: Inking Idaho and Embellish Me


The second tote is from a Papercrafts Magazine Template. You can find the template here in the Downloads forum at SCS. This is the most simple tote you can ever make and yet so versatile. You can use ribbon for the handles or create using two handles on each side.


For the third tote, I created a tote that StarlitStudio created awhile back...one of my most favorite totes to make (you can find the original post here). The holder accommodates 6 cards and 6 envies. You can probably even put chocolates in there instead of cards as a gift. It uses the TAC Spring Flowers stamp set, velcro for the enclosure. I used a little bit of 3d glitter and puffy paint on the scallop border and on the flower images.

I've created printable instructions for each of the projects above for your reference (credits have been noted for each template):


MINI MAGAZINE CARD HOLDER...stamps: tac flower trio collage paper: chocolate chip/white cs, unkown manufacturer paper stack dp ink: palette burnt umber, real red, pumpkin pie, old olive accessories: nestabilities circle and scalloped circle, clear decorative mini pebbles, satin olive ribbon, terrifically tacky tape 1/4"

PAPERCRAFTS CARD HOLDER...stamps: tac seeds of blessing paper: black/white cs, unkown manufacturer paper stack dp ink: palette noir, real red accessories: nestabilities rectangle and scalloped rectangle, string, wide red grossgrain ribbon, martha stewart lace border punch, dimensionals, paper piercer, terrifically tacky tape 1/4"

6 CARD-6 ENVIE CARD HOLDER...stamps: tac spring flowers paper: white/hot pink cs, unkown manufacturer paper stack dp ink: palette noir, summer sun, passion in pink, old olive accessories: slit punch, wide hot pink grossgrain ribbon, 3d glitter paint verry berry red, 3d iridescent paint white mist, diamond stickles