Friday, July 31, 2009
August '09 Sheetload of Cards - Ready for Download Today!
Sheetload of Cards August '09 Sneak Peeks

Thursday, July 30, 2009
Quickie Announcement...I am a Paper Maniac!!!

Wednesday, July 29, 2009
PARTY! PARTY! PARTY!


I created a matching acetate favor box filled with Hershey Kisses. I also used the thank you sentiment from Pierced Tags on the side. I was surprised to see how tiny this box came out to be when I finished putting it together - so cute! You can find the tutorial for the acetate box here. I might end up making these for my kids birthday parties.
Digital Images: Angels Landing (Marching Band 1, Pierced Tags)
Patterned Paper: DCWV (Nana’s Kids)
Cardstock: Unkown (Kraft, White)
Accessories: Offray (White Grossgrain Ribbon), Stampin’ Up (Word Window), Scotch Mounting Foam, 2 Pennies, Glitter, Transparency Sheet, Glue Dots, Tacky Tape
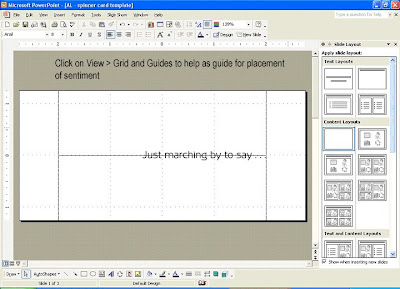
Spinner Card Tutorial Using a Digital Sentiment


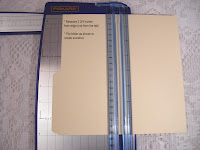
6) Now all you have to do is cut your paper down to 2.5 x 5.5 inches. Make sure to print on a piece of scrap paper first so that you don't waste any cardstock in case you have to make adjustments on the placement of the sentiment.
Monday, July 27, 2009
Cora Cooks Pancit
I just so happened to be browsing Elizabeth Dulemba's blog and saw this article on a children's book called, "Cora Cooks Pancit." Me being a Filipino (or Filipina I should say), the word "pancit" in the title totally caught my eye. It is illustrated by Kristi Valiant, written by Dorina K. Laazo Gilmore. She featured an interview with Kristi on her blog, you can read here. It looks like a pretty interesting book to read to my son and daughter.
If you are not familiar with "pancit" (pronounced pahn-sit)...it is a traditional Filipino dish with many versions. The most popular version is made with noodles, veggies and meat (chicken or beef). Yum! Now, I've never made pancit myself since I always had my Mom, one of my Mom's friends, or the Filipino store to run to if I had any pancit cravings (I was spoiled!). But now that I live so far away, the only time I get to eat it is during the holidays when we visit my family. I do know how to cook a lot of my fave Filipino foods and my own family has learned to love eating the food I cook - well, they have no choice. We do eat lots of rice with many of our meals but pancit has been a long time tradition especially made for family gatherings. I really miss all of the Filipino/Oriental stores I could go to for ingredients you can't find in a regular store. I know there is one somewhere near me, but we haven't ventured in that area yet.
Anywho, I was just excited to see this multi-cultural book featured on Elizabeth's blog so I wanted to take some time to talk about it here. It's nice to see when people expand their writing about different cultures. And this is definitely something you don't see very often in bookstores.
Thanks Elizabeth for a wonderful post about the book and Kristi's illustrations!
For those of you who love to eat - here is a recipe I found: How to Make Pancit. Now I've got to try to make it myself one of these days.
Angels Landing Blog Candy: And the Winner Is...
Drumroll please!!! And the WINNER is...
July '09 Sheetload of Cards - Beyond the Card Sample


This is my last sample for the July'09 Sheetload of Cards issue...a Beyond the Card project: Digital Stamp Catalog. I was so excited when I heard that my first assignment was to work with digital images from Squigglefly. I've collected so many digital images over the last couple of months, I thought it would be nice to make myself a book that I can refer to when I am looking for just the right image to use on my cards and projects (in the spirit of trying to get organized).
Digital Stamps: Squigglefly (Yum!)
Patterned Paper: Me and My Big Ideas
Cardstock: Georgia Pacific (White), Unkown (Purple, Light Peach, Vanilla)
Label: Computer Generated (Pharmacy Font)
Ink: Tim Holtz (Antique Linen), Stampin' Up (Black); Die Cut: Spellbinders (Classic Circles)
Ribbon: Offray (Wide Purple Grossgrain Ribbon)
Flower: Prima
Punch: Stampin' Up (Slit, Tab), Target (Small Corner Rounder), Crop-a-dile
Other: Corrugated Box Piece, String, SEI 8x8 Album, Aleene's Paper Glaze
Coloring: Prismacolor Pencils blended with Baby Oil (Cool Grey 50%, Warm Grey 70%, Blush Pink, Pale Vermillion, Blue Slate)
MAKE IT YOUR OWN: Used a 8x8 scrapbook album to create a digital stamp catalog. Recycled a piece of corrugated box in place of PP1. Used Stampin' slit punch and crop-a-dile to create scalloped border. Tore bottom of corrugated box layer to create some depth.
Sunday, July 26, 2009
Did you notice something different about my blog?
So do you likey my new title for my blog? I think it just sounds more catchy than just "Stamping Mutt", don't ya think?
Anywho, I kind of like the sound of it.
Friday, July 24, 2009
July '09 Sheetload of Cards - Reminders!
Don't forget that the July issue of SheetLoad of Cards is available for download and there is still time to enter the monthly challenges and win FREE digital stamps from the July sponsor, Squigglefly!!
Head on over today and find out how to enter the July Shout Out to SheetLoad and Show Us Your SheetLoad contests.
Wednesday, July 22, 2009
Here Comes the Marching Band Post-It Note Holder and Organizer, Tutorial and a Little Some Some...


** Bare with me on my instructions...I had to retake some of the photos since they did not come out real good. I just have to find out a better way to taking pictures of my tutorials so they are easier to see and look more consistent. **
Step 4: For the pockets, score at 2 1/2 inches.
Step 5: This is what your piece should look like. Your finished piece should have the measurements listed above when scoring has been completed on all 3 sides.
Step 6: Cut out the middle piece out as shown in pic above.
Step 7: Trace entire front panel on patterned paper and adhere it using a white glue stick.
Step 7B: Repeat same step for tracing patterned paper for the inside of the holder. For the orange flowers patterned paper, I placed my piece over the paper, folded the pockets up so that I could get a complete traced image on the paper since I wanted to go all the way down to the score line. For the pockets, flip the piece so that the pockets are laying top side and trace around pocket template.
QUICK TIP: I've learned to trace templates on the "right" side (decorated side) of the patterned paper so that you are sure to get the correct pattern when you are ready to adhere paper to your template. You can always erase the pencil marks after the paper has been glued down.
Step 8: Once you have completed gluing down the patterned paper, cut off extra pieces sticking out of the holder. I also chose to sand down the edges with a sanding block once the extra paper pieces were cut off for a more finished look. Use a small corner rounder to round off the tips of the pockets (optional).
Digital Stamps: Angels Landing (Marching Band 1, Marching Band 2)
Patterned Paper: My Mind's Eye (Maganolia)
Cardstock: Georgia Pacific (White, Jo-Ann's Value Paper Pack (Teal)
Ink: Tim Holtz Distress Ink (Antique Linen), Stampin' Up (Creamy Caramel)
Other: Prima Flower, Crochet Fleurette, Button, Embroidery Thread, Scotch Mounting tape, 3x3 Post-It Note, Terrifically Tacky Tape, Wide Grossgrain Ribbon
Coloring: Prismacolor Pencils blended with baby oil
Tuesday, July 21, 2009
July '09 Sheetload of Cards: Simple, Special, Stunning
One of our DT members, Jessica George, brought her "A" game this month to show off some lovely samples using a digital image from our sponsor, Squigglefly, using the sketch from the July '09 issue of Sheetload of Cards.
Come on over to Sheetload of Cards to check out the July '09 Simple, Special, Stunning...and give Jessica some lovin' while you're there!
Sunday, July 19, 2009
Sunday Reminders
Just a couple of reminders for today...TODAY is the last day for the following:
1) Leave some lovin for our DT members and win yourself some great digi-stamp sets from Angels Landing. Blog candy will be closed by 10pm MST. Click here to go to Angels Landing Blog Hop post...
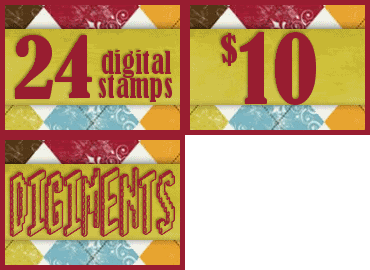
2) Digiments Doorbuster Sale for July release -- $10 for 24 Digiments -- Click here to go to Digiments blog for some inspiration and to take advantage of this awesome sale.
Enjoy the rest of the weekend!
Saturday, July 18, 2009
Digiments July Release and More Sneak Peaks...

Click on thumbnail to link to Digiments Blog

This first card is another sample from the Inspirations series - Lord's Prayer. This card is based on the Card Positioning Systems sketch challenge from July 5th: CPS123. While browsing the net for biblical images, I found this wonderful site that houses biblical/Christian coloring pages (you can find it here). I picked this praying angel because it fit the Lord's Prayer perfectly. I printed off the digiment on patterned paper backed with cardstock for some stability and popped up with Scotch mounting tape. Then I colored in the praying angel, cut him/her out, and popped up on a white circle so it wouldn't get lost in the patterned paper I used. I used some glitter glue on the wings and the image is colored with prismacolor pencils blended with baby oil.

This second card is another sample I made for the Kids Bible Songs series. I couldn't get this song out of my head. This card is based on the Mojo Monday sketch challenge from July 6th: MOJO94. I missed the contest since I couldn't post this card until now. While browsing through the net yet again, I found this great image from Elizabeth O. Dulemba. She writes childrens' books and is gracious enough to offer images to use for cardmaking and scrapbooking. You can find her blog here and images here. If you sign-up for her newsletter, she will send you an update when she's added a new image to her library of freebies called Coloring Page Tuesdays. Again, the image fits the song verse so perfectly. I had such a hard time finding an appropriate image and was ecstatic when I found this on Elizabeth's blog. I also topped off the card with another ribbon flower. The flowers are so much to make! Again, I used an old music sheet for the background along with other vintage-y elements.
NOTE TO ADD: Before downloading images/coloring pages on the net, make sure to respect the artist's copyrights on their images - there are many that are copyright free. A simple email to the artist with your intentions is appreciated. Since Elizabeth's images have gained popularity among crafters, she has outlined the requirements when posting artwork using her images that you can find here.
Friday, July 17, 2009
Digiments Sneak Peak Day Two - Inspirations
 Digiments - Inspirations Series
Day Two of Sneak Peaks...
This is my sample from the Inspirations series. I just love this encouraging quote. I've been into making 3D butterflies lately and it is such a serene and peaceful thing that using it as an embellie fit this quote perfectly. I layered two butterflies on top of each other covered with patterned paper. I used my crop-a-dile to create the holes for the string - thought that added a nice touch to the butterflies. Then I printed off the digiment on vellum (I have been favoring vellum lately). Then I finished off the card with the clear mini decorative accents called skittles or dew drops. Not much to this card, but packs a lot punch with just the digiment, don't ya think???
More to come and release day is TOMORROW! YAY! Come back now, ya hear???
Digital Stamps: Digiments (Inspirations)
Patterned Paper: Jo-Ann's Value Pack
Cardstock: Unkown (Kraft, Vanilla), Vellum
Other: Clear Mini Decorative Accents, String, Crop-A-Dile
Thursday, July 16, 2009
Digiments July Release - Kids Bible Songs

 Click on the thumbnail to link to the Digiments blog
Patterned Paper: Memory Block (Inspirations)
Ink: Tim Holtz Distress Ink (Antique Linen)
Cardstock: Unkown (Vanilla, Black), Georgia Pacific (White)
Die Cut: Spellbinders (Classic Circles)
Ribbon: Red Wide Grossgrain Ribbon
Other: Staples, Music Sheet, Vintage Buttons
Resource List for Digital Sites
I am adding a link to my sidebar as well for easy access...
STORES:
All That Scraps and Blog
Angels Landing Digi-Stamps and Blog
Artisan Group and Blog
BeccaKay Designs
Character Cafe and Blog
Charmed Cards and Crafts
Country Graphics by Trina Clark and Friends
Crafts 4 Eternity and Blog
Crafty Ann's
Crafty Muse
Cute Daisy May and Blog
D.A.I.S.I.E Company
Digiments - digital sentiments
Digital Delights by Louby Loo and Blog
Digital-Ink Co and Blog
DigiStamp Boutique and Blog
Doodle Beans Digital Stamps
DoodlePalace
Dustin Pike and Blog
DZ Doodles and Blog
Edith Designs Corner Shop
Fred, She Said and Blog
Hambo Stamps Digital Images
Ildi Co. Online Shop
Incy Wincy Designs
InStyle Stamps and Blog
JessicaLynnOriginal and Blog
KLM Designs and Blog
Lily-Boo's Boutique
Lindsay's Stamp Stuff and Blog
Little Paper Shop and Blog
McMahon Five Designs and Blog
Modern Sugar Blvd. and Blog
Mo's Digital Pencil Store and Blog
MyGrafico and Blog
Owl Whimsy
Paper Makeup Stamps and Blog
Paper Popsicles and Blog
Pink Cat Studio Digi Stamps
Pink Petticoat and Blog
Pollycraft
River City Rubber Works
Sandra Dry Digi-Stamps
Sassy Studio Design
Say It with Stamps by Jen
Simply Sassy Design Studio
Sketching Stamper and Blog
Squigglefly and Blog
Spiral Whisper - store temporarily closed until 2010
Stamping Boutique and Blog
Sweet and Sassy Stamps and Blog
The Character Cafe
The Cutting Cafe
The Digi Shack and Blog
The Greeting Farm and Blog
TimNShells Digi Downloads and Blog
Two Scoops Rice Designs and Blog
Victoria Case Digital Stamps and Blog
Whimsie Doodles and Blog
Willow Design Stamps
Wink Wink Ink and Blog
ETSY STORES:
Bean Pod Frog Shop and Blog
Digital Stamp Oasis
Digistampcharacters
DoodlePalace
Hop Art Studio - Asela Hopkins handmade cards, embellies, and digi stamps
INktegrity by Joni
Korinstamps
Simply Doodles
Softpencil and Blog
Sunshine's Stamps and Store Blog (Sunshine's Personal Blog)
TimboHunter
Tinker and Co - digital kits, digital stamps
COLORING PAGES/CLIPART/LINE ART/FREEBIES:
Alfy.com
BirdsCards - free images
Christian Clipart
Coloring-Book - images great for kids cards
Coloring-Page Bible Coloring Pages
Disney-Stationary Coloring Pages
DLTK's Bible Coloring Pages
Dover Publications - sign up for newsletter to get snippets of coloring pages
Elizabeth O. Dulemba Coloring Page Tuesdays and Blog - read copyright info when using images
Free Design Goodies
Hellokids.com Coloring Pages
Karen's Whimsy Silhouettes and Coloring Pages - more choices on the sidebar
Kids-n-Fun Coloring Pages
Lost in Paper Scraps - Dawn's Blog (freebies)
Mel Stampz - Mel McCarthy's blog (freebies)
PC Crafter - colored clipart
Princess Elemmiriel deviantART Gallery - anime lineart
QwikArt Stamps Digital Catalog
Raindrop Echo Designs - free images/wordart
Raggedy Scrappin - Art with Heart - colored clipart
Sarah Kay Coloring Pages
Silhouettes Clipart
Stretch N' Bubbles
DIGI SCRAPPING:
Summertime Designs - free digital kits
ScrapOrchard and Blog - digi kits and WordArt
Elegant WordArt by Bethany
DIGI CHALLENGE BLOGS:
MyGrafico Challenges - Monday
Digital-Ink Co Challenge Blog
Digital Tuesday Challenge - Tuesday
Digital Two for Tuesday - Tuesday (vintage digital stamp freebies)
Dare U2 Digi Stamp - Friday
Wednesday, July 15, 2009
Angels Landing July Blog Hop Event - Here Comes the Marching Band!
.jpg)
For today's sample, I chose to create a 3d project called a "Special Date Folio" inspired by Alicia Ekerman (founder of Sheetload of Cards). Alicia posted a tutorial and sample on her blog, you can find it here.
.jpg)
.jpg)
.jpg) Such a fun group of animals! There were enough pages on the mini folio that I got to play with almost all of the musical animals holding their instruments. Project/card ideas are endless for these two sets. The two new image sets are sized to work together. Each animal has two versions, regular and jointed. You can attach the joints together with brads, beads or tiny buttons tied with strong thread. The parts are marked for either piercing with a needle tool or punching 1/16" holes for jointing. The body gets sandwiched between the front & back arms and the front & back legs. All of the jointed arms and legs are interchangeable, meaning that you can have any animal playing any instrument. How's that for thinking out of the box?
Such a fun group of animals! There were enough pages on the mini folio that I got to play with almost all of the musical animals holding their instruments. Project/card ideas are endless for these two sets. The two new image sets are sized to work together. Each animal has two versions, regular and jointed. You can attach the joints together with brads, beads or tiny buttons tied with strong thread. The parts are marked for either piercing with a needle tool or punching 1/16" holes for jointing. The body gets sandwiched between the front & back arms and the front & back legs. All of the jointed arms and legs are interchangeable, meaning that you can have any animal playing any instrument. How's that for thinking out of the box? Patterned Paper: My Mind’s Eye (Magnolia)
Cardstock: Jo-Ann’s Value Paper Pad, Georgia Pacific (White)
Ink: Tim Holtz Distress Ink (Antique Linen), Stampin’ Up Ink (Chocolate Chip)
Die Cut: Nestabilities (Classic Circles)
Ribbon: Wal-mart (Apple Green Wide Grossgrain Ribbon
Other: OfficeMax (File Folder), Prima Flower, Crochet Fleurette, Button, Crochet String
Coloring: Prismacolor Pencils blended with baby oil
Tuesday, July 14, 2009
Angels Landing July Blog Hop
 Just wanted to post a quick announcement...with a new month comes exciting things! Bright and early tomorrow, Angels Landing will be featuring a Blog Hop event to showcase 2 new digital stamp sets! Judi has done it again! In addition to feasting your eyes on some DT eye candy featuring the new sets, you will have a chance to win some yummy blog candy!
So make sure to come back tomorrow and hop on over to Judi's blog first! You won't want to miss it! I'll see you then...
Monday, July 13, 2009
Celebrate Summer Digiments Style
Don't fret if you don't get picked because Michelle will be offering another great sale during the release - $10 for 24 Digiments! Now that is a steal of a deal!
The DT members will start showcasing the new digiments starting on Wednesday so make sure you come back and give us some lovin', ya hear?
Saturday, July 11, 2009
July '09 Show Us Your Sheetload and Sample Card #3

Sentiment: Digiments (Birthday Expressions)
Patterned Paper: Unkown
Cardstock: Georgia Pacific (White), Stampin' Up (Chocolate Chip)
Die Cut: Spellbinders (Classic Rectangles)
Ribbon: Offray (Wide Polkadot Satin Ribbon)
Coloring: Prismacolor Pencils blended with Baby Oil (Spring Green, Apple Green, Burnt Ochre, Sepia, Scarlet Lake, Lemon Yellow, Process Red – cheeks)


